
DML (data manipulation language) is a computer programming language that is used for manipulating data in a database. These operations can be used to insert, update, merge, delete, and restore records in Salesforce. DML operations play a key role both in Apex and Flow. You can perform only insert, update and delete operations using Flow. They are enough for most of the flows but what if you want to undelete records? There is no out of the box undelete records operation in Salesforce Flow. However, it is possible to achieve this with an Invocable Apex action. Read this post to learn more about the available options in the Toolbox of Salesforce Flow.
Where are the Deleted Records?
When a record is deleted, it goes to the Recycle Bin for 15 days and it can be restored from there. All the deleted records are stored in an object called DeleteEvent, which is known as Recycle Bin Item. It is possible to query DeleteEvent records in Flow and find the Id value of the deleted record. Read this post to learn more about the deleted records and how to use this object in Flows.
Find the Deleted Records
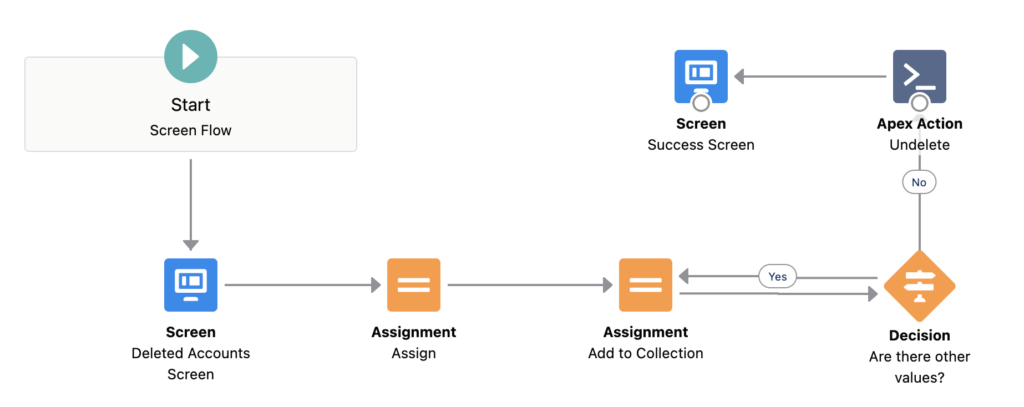
Let's create a screen flow that displays all the deleted accounts.
1- First of all, you have to create a choice set that displays the deleted account records. To do so, create a new Record Choice Set resource and select DeleteEvent (Recycle Bin Item) as the object. In order to get account records only, add a criteria for the SobjectName field. Don't forget that these are the records from the recycle bin. If a record is permanently deleted, you cannot find it anymore.
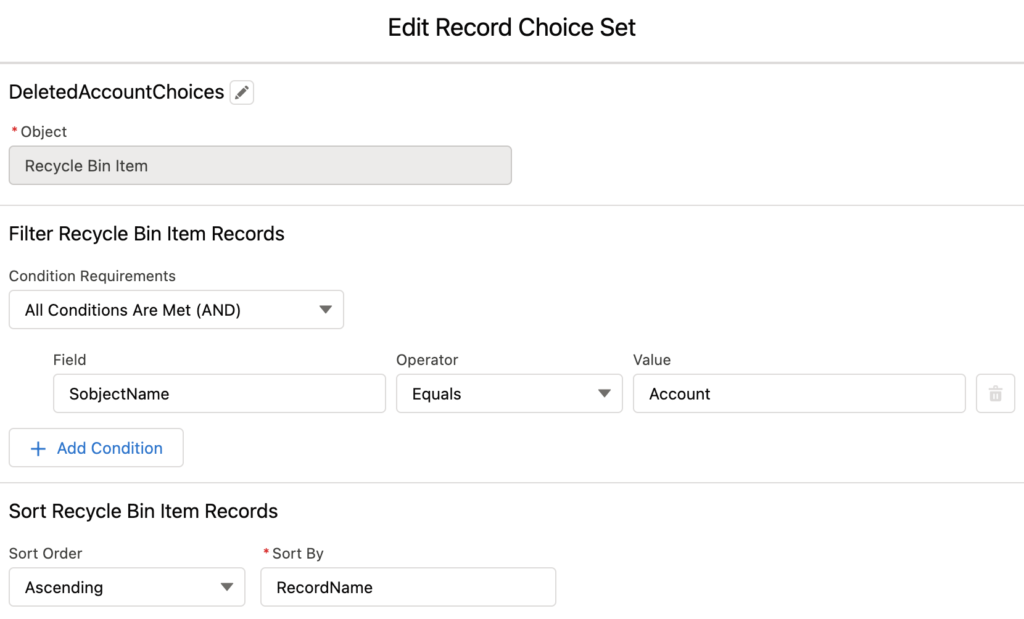
RecordName field stores the name of the deleted record and Record field stores the Id of the deleted record. So in this case, they store the Account Name and Account Id values. Configure the Record Choice Set so that it will display the Account Name as the choice label but it will store the Account Id as the value.

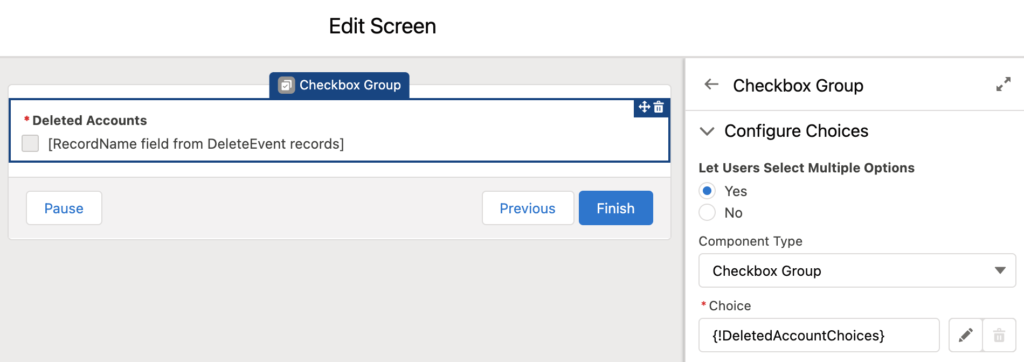
2- Display the choices on a flow screen, so that the user can select some of the deleted account records. In order to do this, drag and drop the screen element and give it a name. Then put any of the selection input components. It can be a picklist, multi-select picklist, radio button, or checkbox group. If you want the user to be able to select multiple choices, then I recommend you to add the checkbox group component.
You can also use custom solutions to display the choices. Take a look at the custom screen components on Unofficialsf. For example, you can use the datatable component in order to display the records like a list view.
3- If you added a component that allows single selection only, then you don't have a problem, you will have the account Id. However, if it is a multi-select component like checkbox group, then you have to convert your selected values to a string collection. This is the trickiest part of the flow, but don't worry, there is a way to achieve this.
Create a new text variable and use an assignment element to add the selected values from the screen and ";" at the end. Pay attention that "Deleted_Accounts" is the checkbox group screen component and not the record choices.

At the end of this assignment, you have a text variable in this format:
Id1;Id2;Id3;
Next, you have to create 2 formulas that store the first record Id and the remaining text. Here are the formulas:
FirstID: TRIM(LEFT({!txtIds}, FIND(";",{!txtIds})-1))
RemoveFirstID: TRIM(SUBSTITUTE({!txtIds},{!FirstID}+";",""))
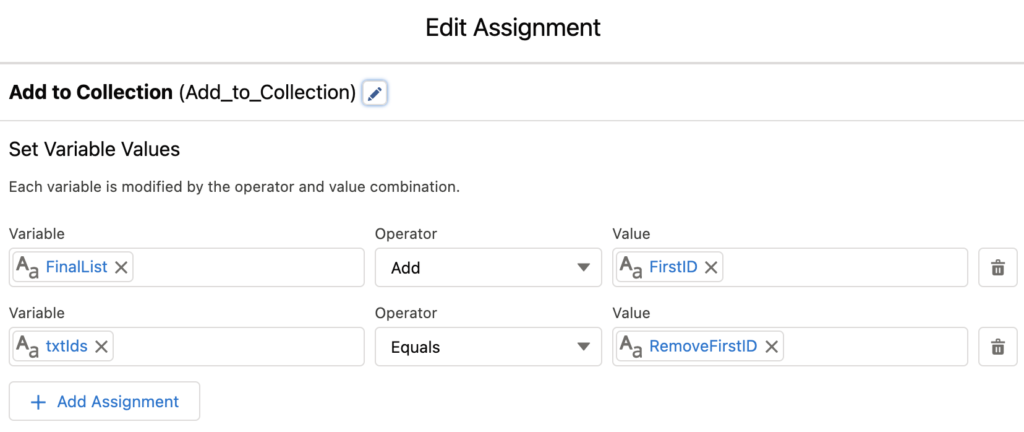
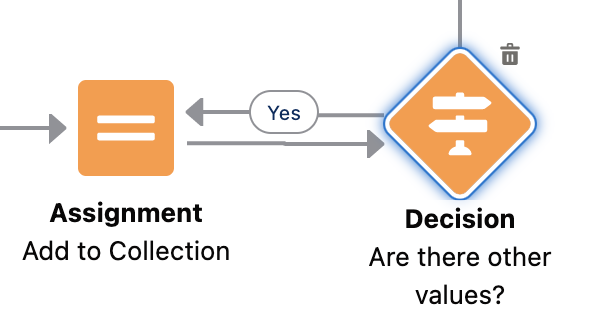
Create a new text collection variable called FinalList (you can call it differently) and use the Assignment element to add the FirstID to the collection. In the same Assignment element, change the value of txtIds to RemoveFirstID formula value.
Continue performing this assignment till there is nothing left in txtIds variable. To do that, use a decision element that checks if txtIds is blank or not.
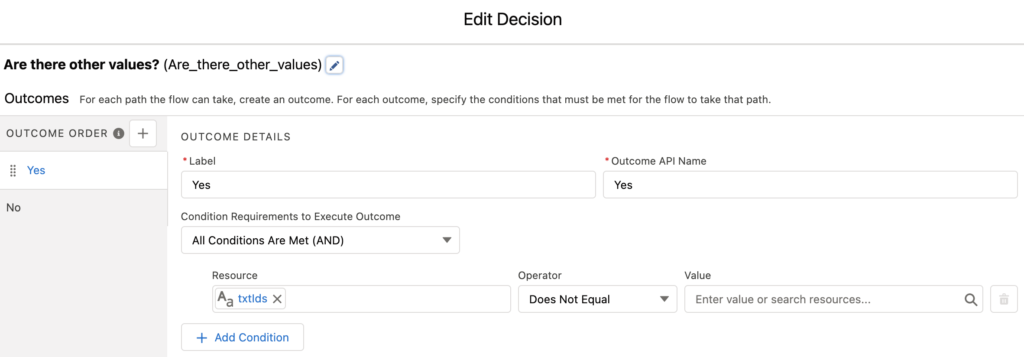
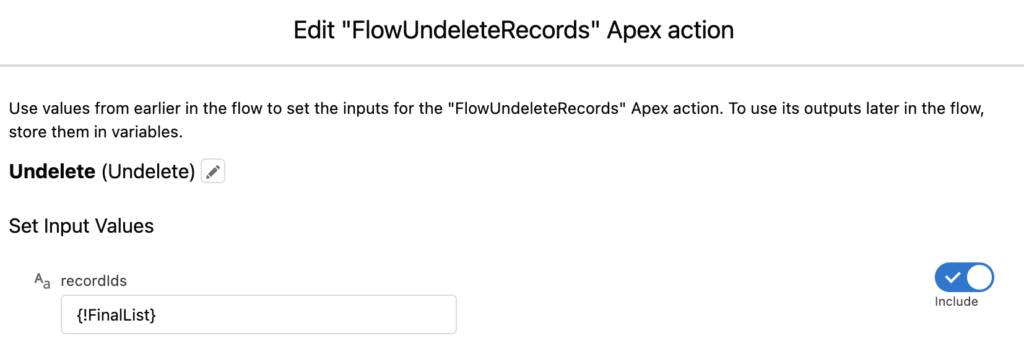
At the end of this loop, you will have a string collection of selected record Ids. This string collection will be used to undeleted those selected account records.
4- It is time to undelete these records. There is no out of the box undelete action, so you have to use an Invocable Apex Action to perform the undelete operation. In order to use this action, you have to create an Apex class. Here is the code for this Apex class.
public class FlowUndeleteRecords {


@InvocableMethod
public static void UndeleteRecords(List<List<string>> recordIds){

List<Id> idList = recordIds[0];
if(!idList.isEmpty()){
Database.undelete(idList);

}
}
}
If you don't know how to create an Apex class, you can install it directly from these links:
Install in Production or Developer Edition
Install in Sandbox
After creating the Apex class, drag and drop the Action element and search for FlowUndeleteRecords (this is the name of the Apex class). As you can see, you just have to pass the string collection of record Ids.
5- Add a new screen to the canvas in order to display a success message. This step is optional, you can skip it or add more actions according to your needs.
At the end, your flow should look like this.
Conclusion
Users can undelete records from the Recycle Bin, so why would you create a flow for this? Because if you create a flow, then you can control the user and add more logic into the process of undeleting. On the other hand, you can add more actions like email alerts to inform relevant users. Another tip is to hide the standard Recycle Bin tab and create a new tab that contains a Screen Flow. However, if you are going to do this, improve the flow because this was just a simple example and it is not ready to replace the Recycle Bin.
Hi Thanks for sharing this but I wonder why instead going to recycle bin in UI but using this approach?
Hi, since it is a flow, you can add more logic to the undelete process. For example, you can send an email/notification when someone undeletes a record. You can hide the standard recycle bin and create your own recycle bin using flow. This way, you will have more control on the recycle bin, for example, you can display the account records only. So there won't be another way for the users to undelete other type of records.
Salesforce keep record you delete to Recycle Bin for 15 days with maximum record of 25 times the Megabytes MBs in your storage. For example, if your organization has 1 GB of storage then your limit is 25 times 1000 MB or 25,000 records.
Great, thanks for the information!
I keep getting a syntax error for the formula fields but I don't know what it is complaining about. I copied and pasted your exact formulas into mine and it keeps saying there is a syntax error:
FirstID: TRIM(LEFT({!txtIds}, FIND(“;”,{!txtIds})-1))
RemoveFirstID: TRIM(SUBSTITUTE({!txtIds},{!FirstID}+”;”,””))
I also named my variables the same as is listed in your instructions. What could I be missing?
Hi Dave,
Try to replace “ with ". I tried and it worked for me. Just remove that sign and enter it again using your keyboard.
I don't understand 2 of the steps:
"Configure each choice" - where is that?
The checkbox group has DeletedAccountChoices. Where did that come from? Did you create that in a loop?
Could you explain, please?
Hi David,
I created a record choice set called "DeletedAccountChoices" in the first step. You can create a new resource, select "Record Choice Set" as the resource type, and then follow step 1.