
Salesforce Flow enables users easily send emails, making it one of the most common and important things you can do on the platform. There are multiple ways of sending emails from flow and one method involves using the core Send Email action. When using this action, you can create a rich text template to use as the email body. Plus, you have the option to include HTML in the text template. Using HTML in an email template is crucial for crafting visually appealing and dynamic content. It enhances the overall engagement and impact of your messages. It's not just about adding colors or images. Using HTML, you can even send an email with a record table.
About HTML Tables
In HTML, tables are essential for effectively organizing and displaying information. They enable a systematic presentation of data, ensuring visual coherence and easy comprehension. Utilizing tags such as <table>, <tr> (table row), and <td> (table data), HTML allows for the efficient creation and structuring of tables. HTML tables stand out as an important tool for visually shaping information representation on the web.
Here is how to build an HTML record table and include it in the email body.
Building an HTML Table in Flow
Here is how to use the Flow elements to build an HTML table. Let's build a table of case records and send an email with this record table.
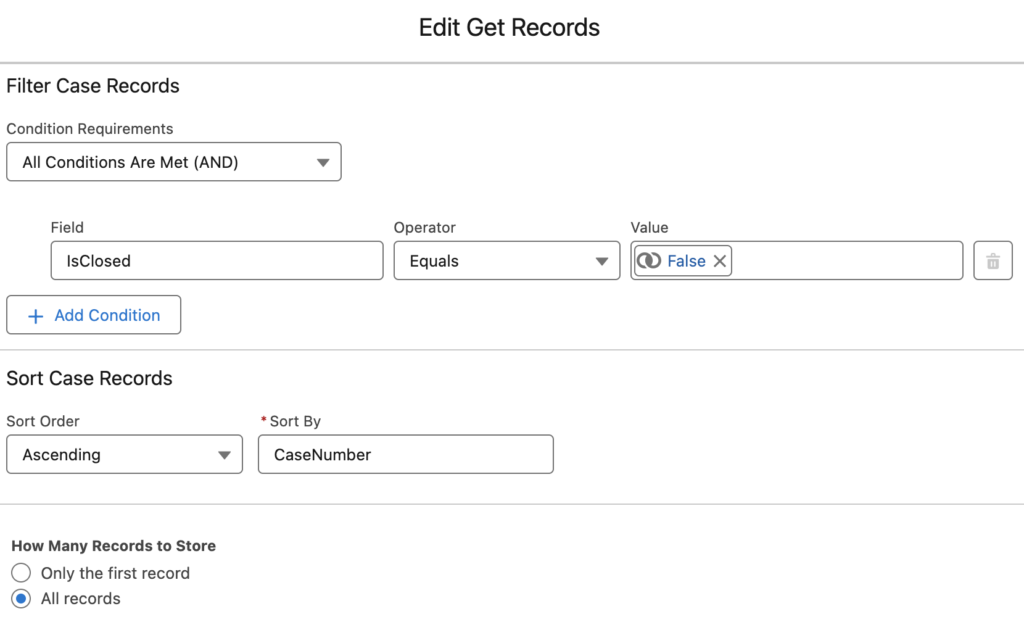
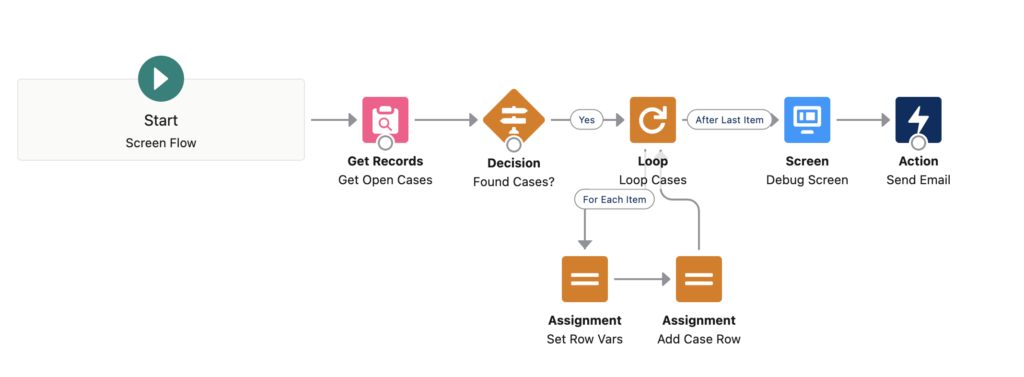
1- Add a Get Records element to get the case records. You can enter any criteria that you want. In this example we will get the open cases.
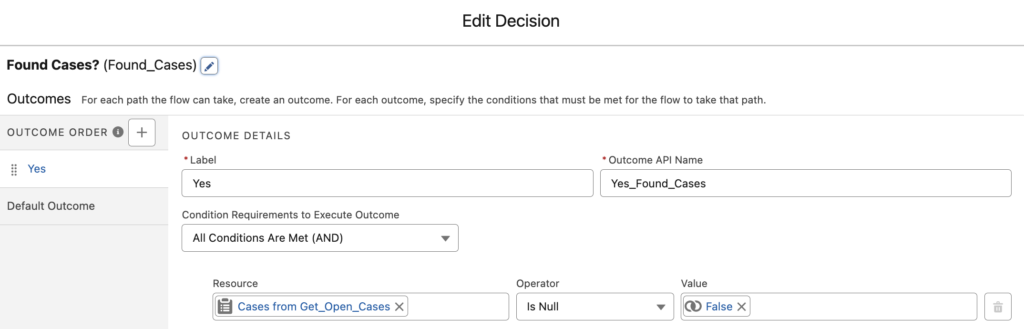
2- Add a Decision element to check if there are records, so that you won't build an empty table.
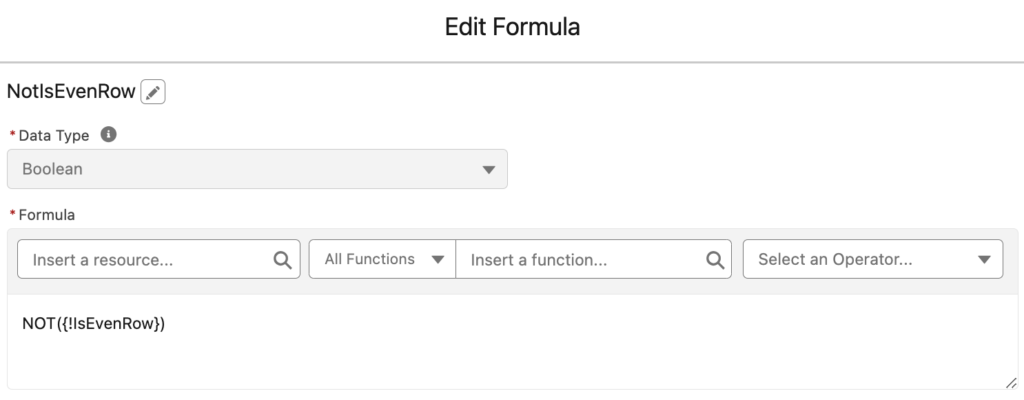
3- Add a Loop element to iterate over the case records. Then, add an Assignment element to assign row number and a boolean that indicates if it is an even row. This part is completely optional. Implementing these variables will enhance the table's visibility in the user interface.

RowNumber is a number variable, we will include this in the table rows. IsEvenRow is a boolean variable that we set to true and then to false for each row. For instance, it should be false for the first row and should be true for the second row. NotIsEvenRow is a boolean formula that returns the opposite value of IsEvenRow. We will use these resources to set alternate row color.
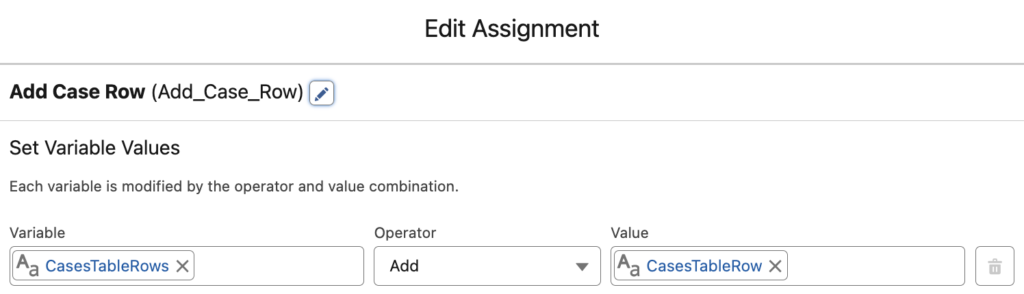
4- Add another Assignment element to assign the rows. Create a text variable called CasesTableRows and a text template called CasesTableRow.
The important part is to build the CasesTableRow text template. This text template represents each row of the record table. Here is the HTML behind this text template.
<tr style="{!IsEvenRowStyle}">
    <td style="{!AllCellsStyle}">{!RowNumber}</td>
    <td style="{!AllCellsStyle}"><a href="{!OrgURL}{!Loop_Cases.Id}">{!Loop_Cases.CaseNumber}</a></td>
    <td style="{!AllCellsStyle}">{!Loop_Cases.Account.Name}</td>
    <td style="{!AllCellsStyle}">{!Loop_Cases.CreatedDate}</td>
    <td style="{!AllCellsStyle}">{!Loop_Cases.Status}</td>
    <td style="{!AllCellsStyle}">{!Loop_Cases.Origin}</td>
</tr>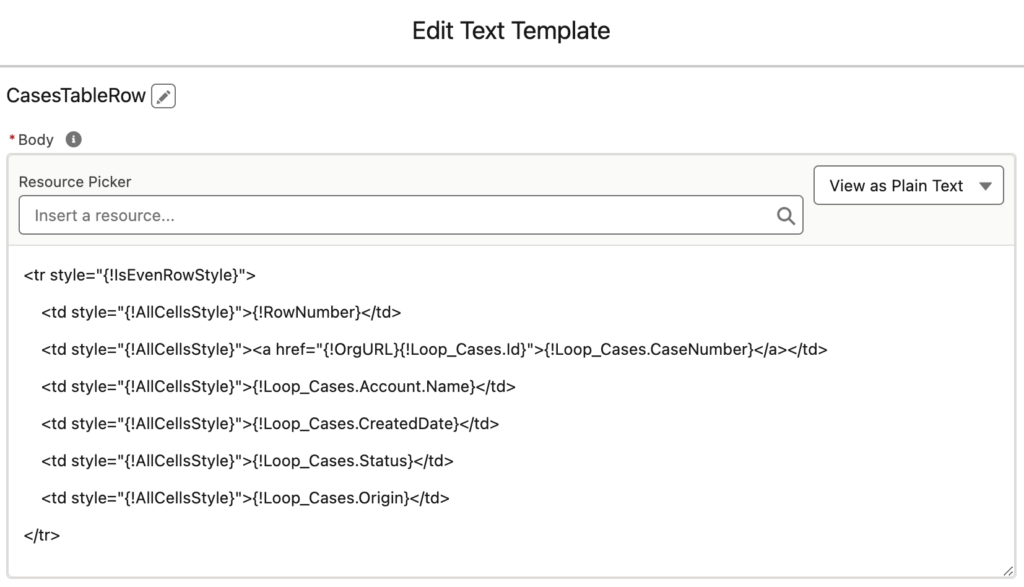
As you can see, it has the columns (case fields) in <td> tags. If you want to add more columns or change the existing ones, this is the place to do that change. Pay attention that it uses a formula to make the CaseNumber clickable. Read this post to learn how to build a record link in flow.
Additional Text Templates for the HTML Record Table
- Create a text template for the header of the record table. Here you can set the color and the column labels.
<tr style="background-color: #4CAF50; color: white;">
    <th>#</th>
    <th>Case Number</th>
    <th>Account Name</th>
    <th>Opened Date</th>
    <th>Status</th>
    <th>Case Origin</th>
</tr>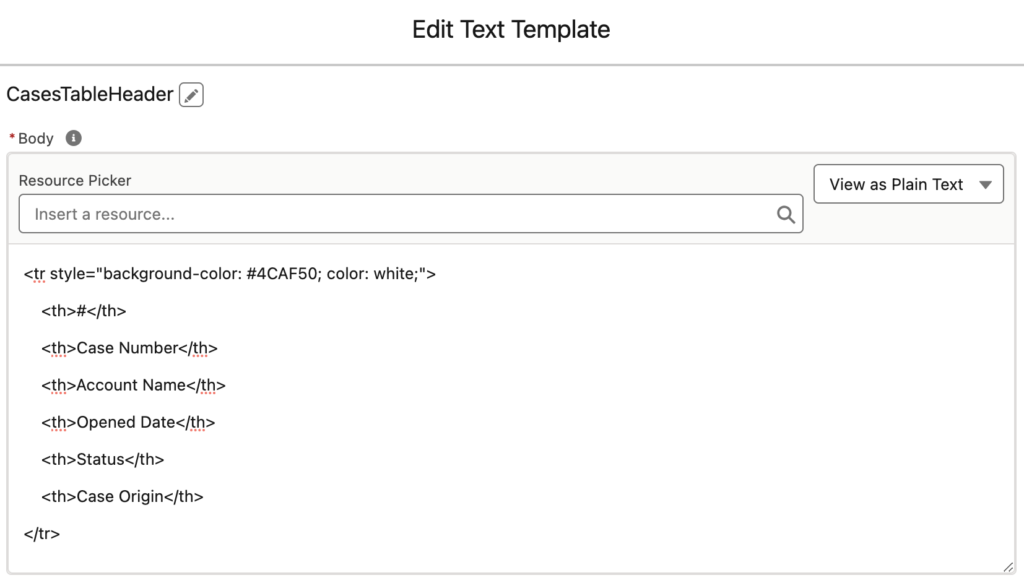
- Create another text template for the styling of the cells.
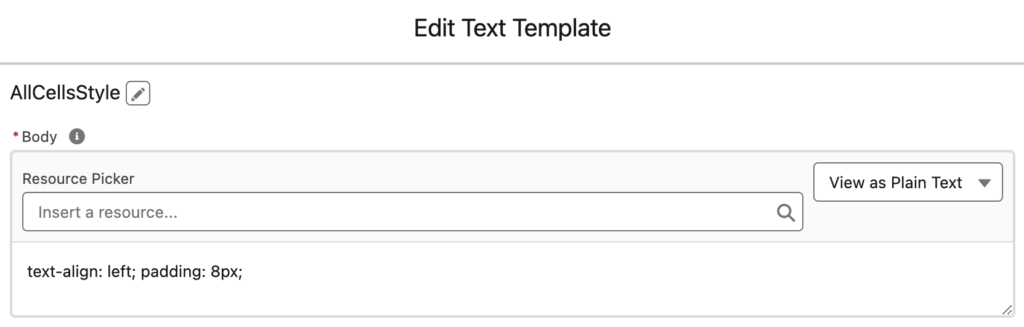
text-align:left; padding: 8px;- Create one last text template to combine the header and the rows (previous text templates). This is the final record table that you want to use in the email body.
<table style="border-collapse: collapse; width: 100%;">
    {!CasesTableHeader}
    {!CasesTableRows}
</table>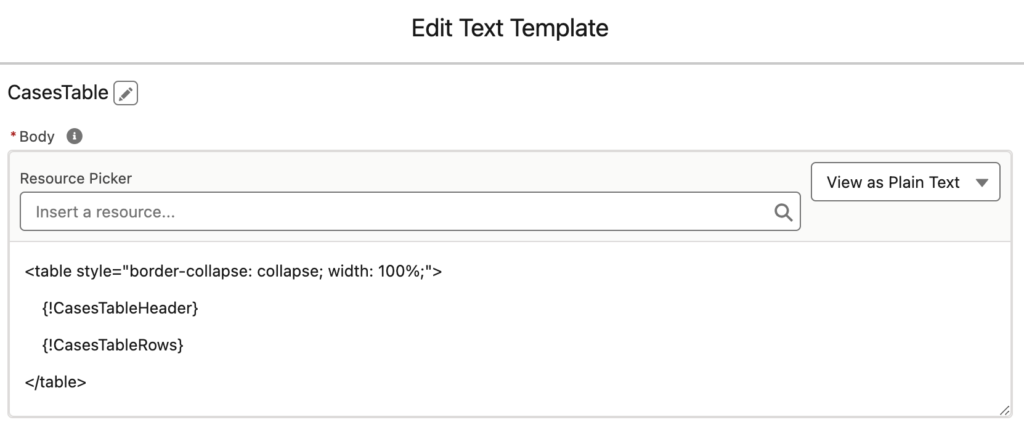
Here is the formula for alternate row color.
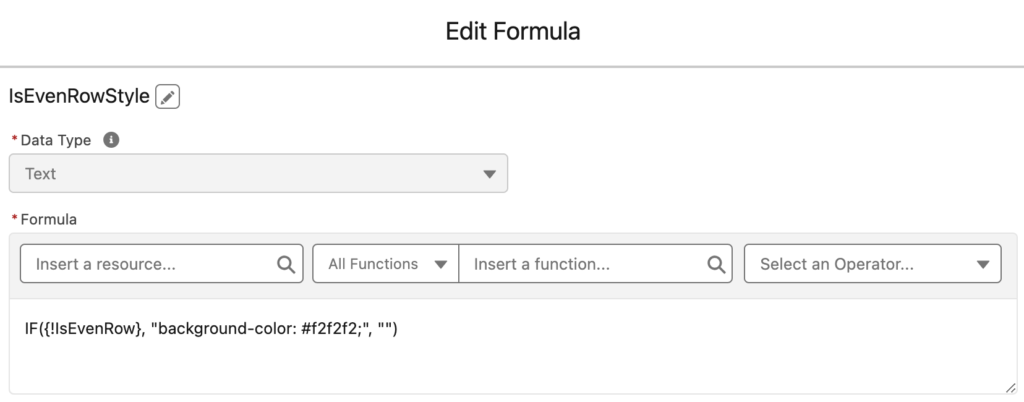
IF({!IsEvenRow}, "background-color: #f2f2f2;", "")Using the Record Table
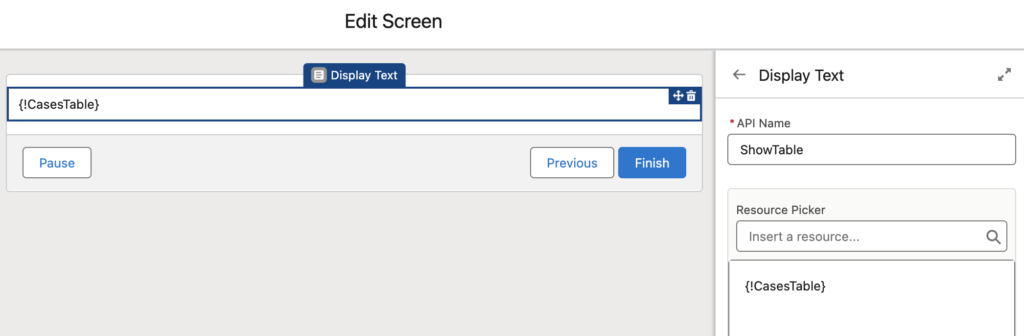
Following these steps, record table is ready for use. If it is a screen flow, you can use a display text element to display the table. Just add {!CasesTable} to the display text component.
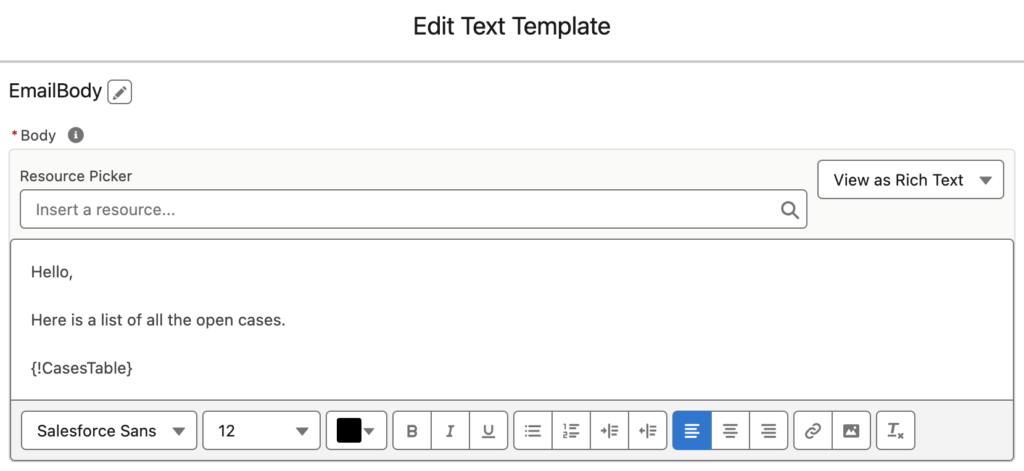
Add an action element in order to send email with this record table. You can choose the CasesTable as the email body or create a new text template that includes the table. For instance, here is a new text template for the email body.
At the end, your flow should look like this.
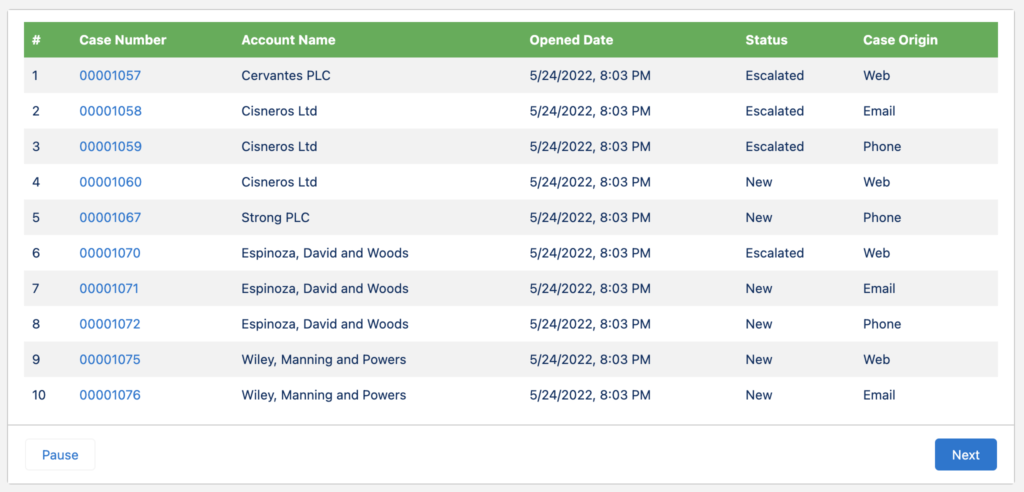
Here is how the record table looks. As you can see, there are row numbers and rows are grey and white for better visibility. Moreover, case numbers are clickable.
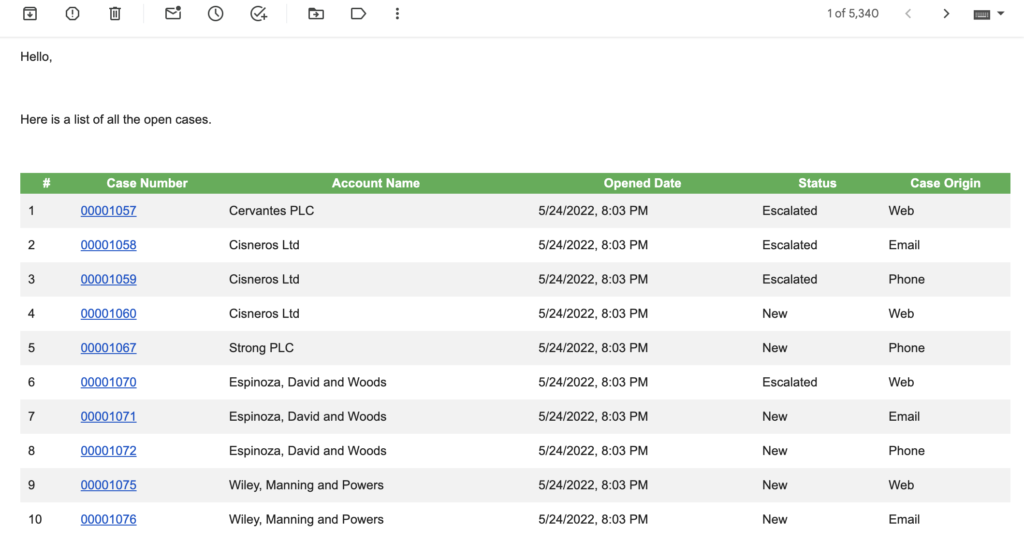
Here is the email that contains the record table.
Installation Links
Although you can follow these steps to build your own record table, it may be a long exercise. Therefore, you can install this autolaunched flow that builds a record table of cases. You can call it as a subflow, pass a record collection and get the record table as an output. However, it is working with the case object only. Therefore, you have to clone the flow or change it to meet your requirements.
Use this link to install in production or developer edition environments.
Use this link to install in sandbox environments.
Very nice table created and really useful!
I used this for invoice dunning where the account receive a list of all pending invoices.
It's just a shame that the standard send email flow action doesn't allow multiple attachment.
I agree!
I follow the same steps but the table doesn't looks like as shown in the page
there has are some steps which are not mentioned in this post
Can you try with 1 or 2 records and then send me the final HTML?
Does it just look different or not working at all? There is an installation link in the post, you can install the flow that I built and see the differences.
Varirable {!IsEvenRowStyle} is missing. I'd like to see the alternate colors of the rows. Thanks!
Thanks! I added it to the post.
Here is the formula:
IF({!IsEvenRow}, "background-color: #f2f2f2;", "")
What kind of variable is it?
It is a text formula.
Hi Yumi, great exercise. I have just one problem: My table is empty. No matter what filter I use at the get record.
Also I would like to use this flow with a account like a action button. But then I need to hand over the specific account id and obviously only show the cases from this account. How can I do this?
Could you help a junior admin out please?
Kind regards
Alex
Hi Alex,
You have to do a get in your flow and then pass the case records collection to this autolaunched flow (call it as a subflow).
Also in your sandbox package there is no get records element.
Thank you for the tutorial! While the debug screen looks good, my emails are just displaying the html code rather than the rendered table itself. Do you know what might be wrong?
Please make sure that you set Rich-Text-Formatted Body to True.
Great guide, helped me a lot understanding record table flow mechanics
Having an issue where [,,,,,,,] appears above the table. Everything is working perfectly but I cant figure out how to get rid of this text.
I'm seeing that also and my data rows aren't aligning to the header row. Did you figure it out?
Having the same issue, did you have any luck?
This happens if you created your "tableRow" text variable as a collection variable; the collection is listed in debug as a comma separated list, like this: [RecordId, RecordId, etc].
I changed it to a simple text variable ("Allow multiple values (collection)" de-selected), and it fixed it for me!
Hi, Thank you for your help on this feature. I have followed exactly the same steps but I keep getting an shift of columns on the second row onwards and this happens only in an email. If I print in a table in the flow, its works fine. Header and first row prints correctly though even in the email. I could only show this in a screenshot if you need more clarification on the problem. Your help is much appreciated.
Hi Yumi,
I just stumbled on your post today and I can say its an amazing.
Thanks so much for this. I can see several use cases I will be using this as well as making several adjustments to suit my purpose.
However, I noticed that the data rows don't align with the header rows.
I can see the same on the Screenshot on this post.
How can we fix this?
Thanks
Hi @Yumi-- I'm re-created this flow and altered this for Opportunity Table use and am attempting to sending as an email. However I am running into an issue where the email body is no longer displaying HTML tags with the Rich-Text-Formatted Body = "True" but now the table elements isn't being created in the email body and is still displaying HTML elements for strictly the border,header, and table. Any ideas?
All text templates are set to plain
and I've confirmed that I have created all the text templates correctly with Plain Text even the Email Template.
Has anyone ever been successful altering the font color of a row with this alternating IsEvenRowStyle depending on criteria? For example, I have this table output Opportunities and would like to highlight some rows depending on a number... Days_until_Close < 21
Hi Yumi, How are you?
I tried to follow your tutorial but in the API 62 version, flow is not accepting text template as variable.
can you check?
You need to apply your styling to the header table, too. the allstyles should be there as well. Changed it on mine and everything lines up
Great job! One note is that the ALLStyles CSS needs to be applied to the header rows as well. Otherwise, you'll have misaligned table rows.
I'm seeing a shift of data in the last column of the table when using this table in a text template. The data in the last column is shifted up to the of the cell in the table header and the table as if the entry was made with a few extra carriage returns. It also looks like this is the cause of the header row and table rows being larger than needed. Does anyone know how to fix this?
how can i do grouping?
Please add a way to copy AllCellsStyle, right now there's only a screenshot
Hi Michael, I added it now.
Work great, thanks