

If you've worked with large data volumes in Salesforce, you know the drill. You can't just update thousands of records in one shot and hope for the best. Governor limits, record locking, API throttling; the platform processes things in chunks, not all at once. That's why batching shows up everywhere: Bulk API jobs, Batch Apex, the batch size setting on scheduled flows. Each one breaks a big job into smaller parts so it actually finishes instead of timing out or blowing past a limit. Salesforce recently added another option to this list: Batch Management. Using Batch Management, you can run flows on large data sets in a smarter way.
Batch Management in Salesforce
Batch Management is a Salesforce feature that enables organizations to process large volumes of records efficiently without writing custom Batch Apex code. It divides eligible records into smaller, manageable groups and processes them through a flow or another supported business process.
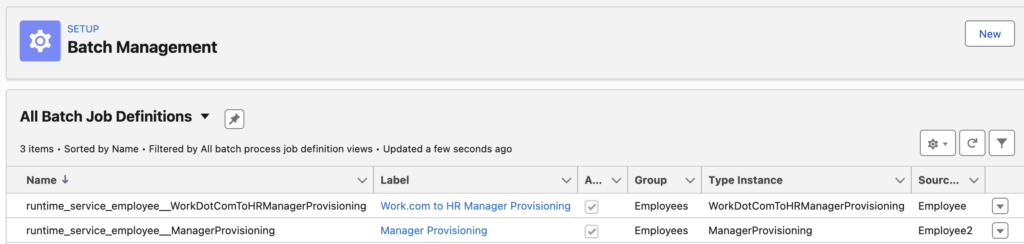
You choose which records get included either by uploading a file of specific record IDs or by defining filter conditions, so the same tool works for a one-time cleanup or a recurring nightly sweep.
Once a batch job runs, Monitor Workflow Services shows the status of every run and every part inside it. It lets you cancel a run that's still in progress, and lets you resubmit just the records that failed instead of starting over from scratch.
How to Create a New Batch Job
Let's walk through a real example: automatically marking Opportunities as Closed Lost if 10 days have passed since their Close Date and they're still open.
1- Build the flow that does the work
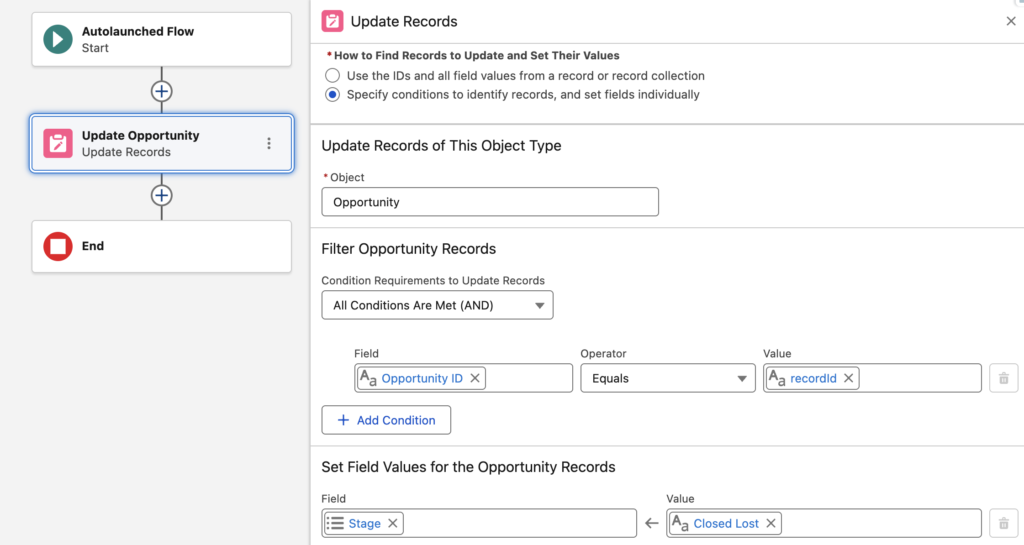
Create an autolaunched flow that updates the Stage of an Opportunity record to Closed Lost. Create an input variable to receive the Opportunity record ID and design the flow to process one record at a time.
2- Create the batch job
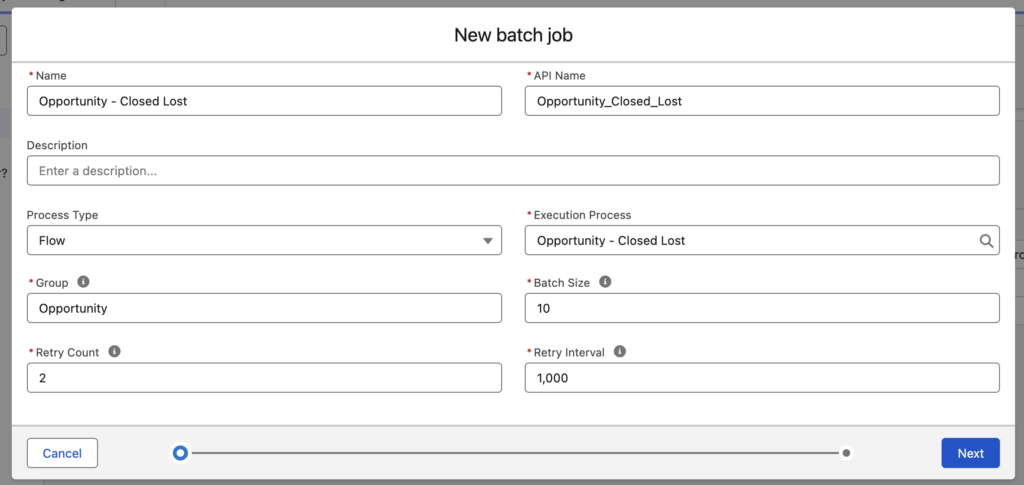
- Go to Setup, search for "Batch Management", click New, and enter a name.
- Select "Flow" as the process type, and then select your autolaunched flow as the execution process.
- Enter a group name, which identifies the group that the batch job belongs to.
- Choose a batch size (1-2000), retry count, and retry interval. The maximum retry count is 3. The retry interval specifies how long the system waits before retrying a failed batch job and can range from 1,000 to 10,000 milliseconds.
3- Configuring the inputs
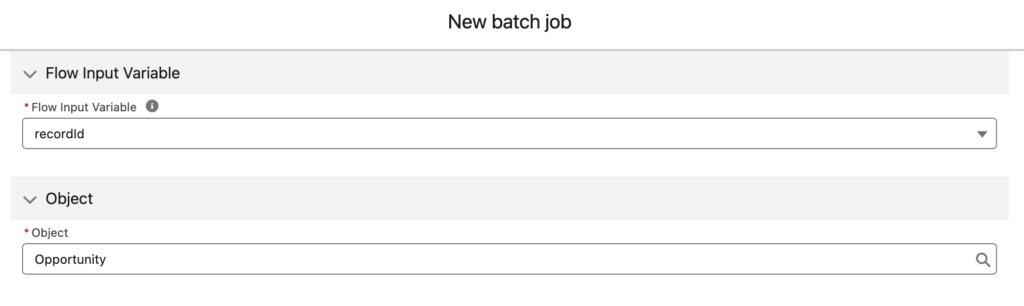
After you click Next, a screen appears where you can configure the inputs. First, select the input variable you created, and then choose the corresponding object (Opportunity in this example).
Then, configure which records will enter this batch job. There are 2 options:
- Use records from a file (upload a file that contains record Ids)
- Define conditions (just like you do in Flow)
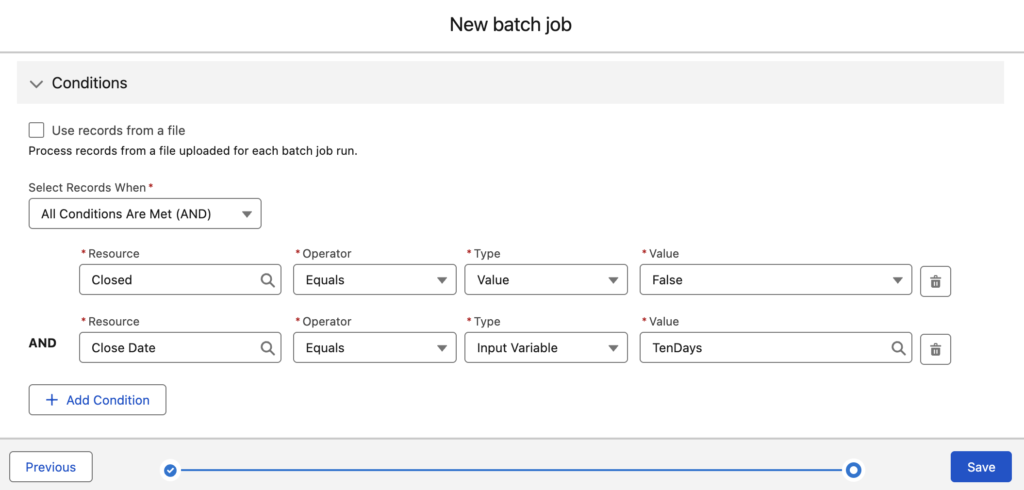
As mentioned earlier, we want this process to run for Opportunities that are still open and whose Close Date was more than 10 days ago. To define this second criteria, select Input Variable as the type. This creates an input variable for the batch job that you can use to filter the records to be processed.
After this step, click Activate to activate the batch job.
4- Running the batch job
Now that we have created the batch job, it is time to run it. Since we want the job to run daily, we will create a schedule-triggered flow that invokes the batch job.
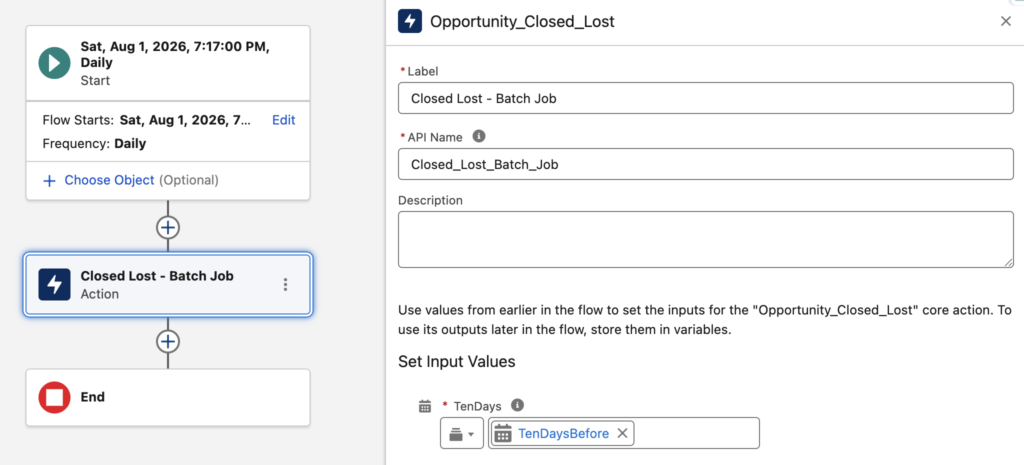
Create a schedule-triggered flow and leave the Object field blank. Add the batch job as an action. As you can see, the TenDays input variable appears in the action’s input values. Create a formula that returns the date 10 days before the current date, and pass the formula into the TenDays input variable.
Monitoring and Retrying Batch Job Runs
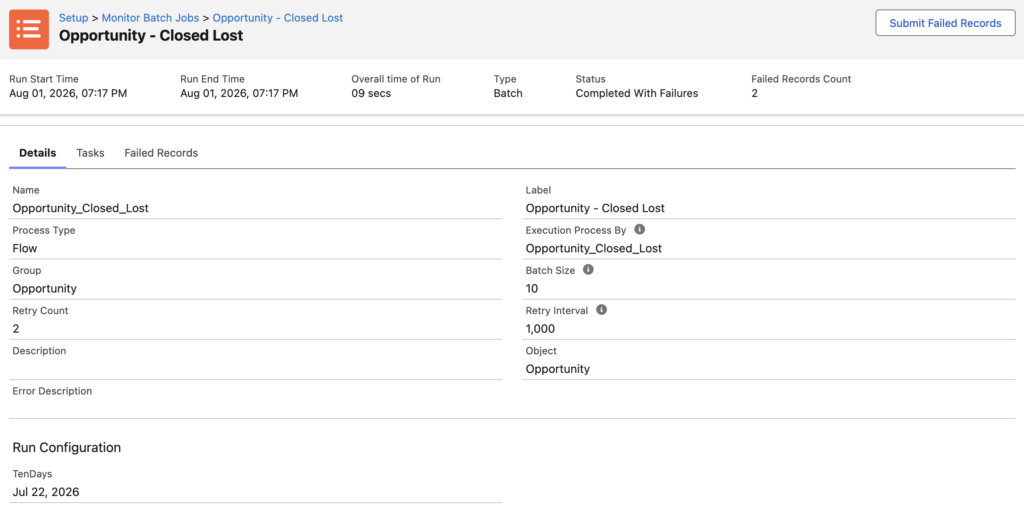
When the schedule-triggered flow runs, it calls the batch job, which processes the matching Opportunities 10 at a time, the batch size we set earlier. Instead of running all matching records through a single transaction, Batch Management splits them into these smaller parts and processes each one separately, which is what keeps the job from hitting governor limits even as your data volume grows.
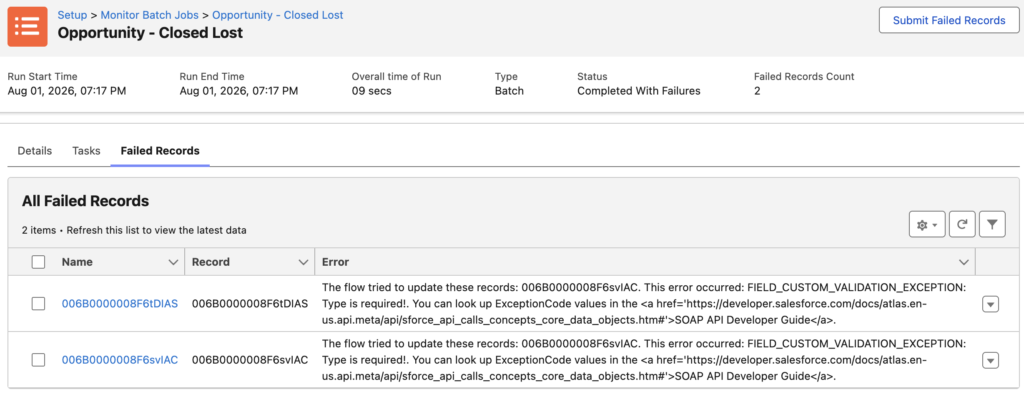
You can monitor the status of each run from Monitor Workflow Services in Setup. Here you'll see every run of your batch job. Broken down into its individual parts, along with how many records in each part succeeded and how many failed.
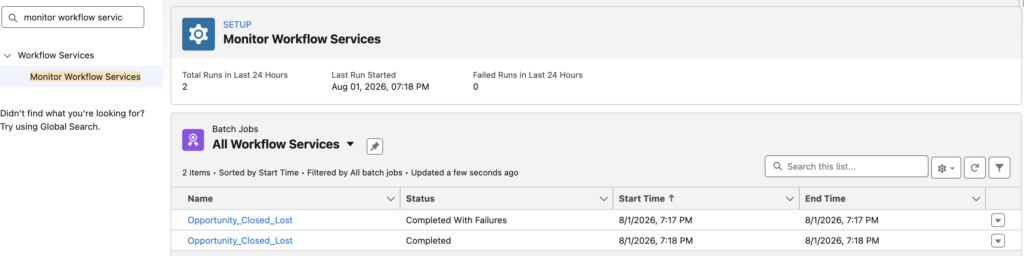
This is a big step up from a plain scheduled flow, where a failure just generates a generic error email and leaves you digging through debug logs to figure out what actually went wrong. In Monitor Workflow Services, you can drill into a specific part and see the exact records that failed to process, along with the reason for each failure, whether that's a validation rule, a record lock, or a conflict with another automation. From there, you can resubmit just those failed records instead of re-running the entire job, so the records that already succeeded are never touched twice.
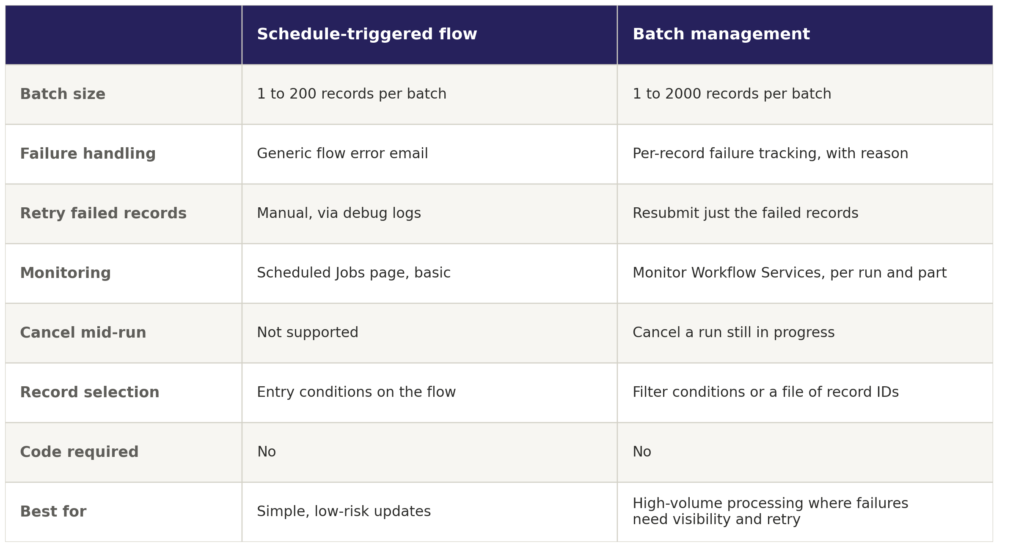
Batch Management vs. Schedule-Triggered Flow
You might be wondering why we didn't just build this directly as a schedule-triggered flow. Schedule-Triggered Flow already supports batch sizes and could run the same update on its own.
The reason comes down to what happens when something goes wrong. A schedule-triggered flow processes its batch as part of one transaction. If a handful of records fail (a validation rule blocks one, another automation conflicts with a second), you get a generic flow error email and no easy way to see which records failed or retry just those.
Batch Management solves this by wrapping the flow in a proper job framework: it tracks every part of every run, records exactly which records failed, and lets you resubmit only the failures. The schedule-triggered flow still has a role here, but it becomes the trigger that calls the batch job rather than the tool doing the actual record processing.
In short, use Batch Management when you need visibility into failures and the ability to retry them without re-running everything from scratch.
Batch Management? That is new to me so I did some investigation...
If you are using a standard Salesforce Developer Edition org (or standard Sales Cloud/Service Cloud), you will not see the declarative Batch Management tool in Setup because standard developer orgs mimic standard Sales and Service Clouds, which lack the required Salesforce Industries licenses.
Salesforce provides specialized Developer Edition orgs that come pre-loaded with specific cloud licenses (like Health Cloud, Manufacturing Cloud, or Loyalty Management) where Batch Management is fully active.
1. Go to the Salesforce Developers Trials and Orgs page.
2. Sign up for a specific industry trial org (e.g., Loyalty Management or Manufacturing Cloud).
3. Once created, search for Batch Management in the Setup Quick Find box.
That's new to me as well. I couldn't find it in my Developer Edition environment, but it was available in my prerelease environment.
However, I checked a few production environments without Industries, and Batch Management was available in all of them. So, I believe it is now generally available.
Thank you, Yumi.
This was exactly the tool I needed, and I can confirm that it is now in both my Production Org and Sandbox.
I have a question regarding a use case where I need to send emails to Contacts on their birthdays. The Scheduled Flow would trigger if a Contact's birthday is today. However, if there are failures and I find out the next day, how will Batch Management rerun the failed ones since the date has already passed?
Thank you for this great article! I have tried it out and it works great.
There are two downsides though: once you have created a Batch Management job, it cannot be deleted, only deactivated. Also, when a Flow is associated with a Batch Management job, it cannot be deleted. This was confirmed by Salesforce support. It can only be done through Metadata API.