
Salesforce is tightening email security by enforcing domain ownership verification for any domain used to send user-authored email. In practical terms, this means email from unverified domains won't be delivered, even if the sender's individual email address is verified. With this update, every org needs to review which domains it sends from and complete verification to avoid a sudden disruption to outbound email.
Email domains from common public providers like gmail.com and outlook.com are exempt from the domain-level verification requirement. This update also doesn't affect emails sent using Gmail or Office 365 (Outlook) integrations, or messages sent through Salesforce Einstein Activity Capture (EAC). Also, domain-level verification isn’t required in orgs where Salesforce sends email via a substitute domain. For example, Salesforce Free Suite and trial orgs.
Implementation Timeline
Salesforce is rolling out this enforcement with Spring '26, Patch 10, beginning March 9, 2026. To see when it applies to your org, check Trust Status.
For new sending domains, verification is required immediately. This includes new domains added to existing orgs, as well as all domains in new orgs and new sandboxes. For existing sending domains, any domain that has been used to send email in the last 30 days must be verified by March 30, 2026 for sandboxes, and by April 27, 2026 for production orgs.
The safest approach is to verify any new, planned, or previously used sending domains as soon as possible.
Required Action
To keep outbound email working without interruption, you need to verify every sending domain in Salesforce. You can do the email domain verification by making a small DNS change to prove you control the domain. Salesforce supports two approaches:
- DKIM (DomainKeys Identified Mail): Generate and enable a DKIM key in Salesforce, then publish the provided DKIM record in DNS.
- Authorized Email Domains: Add the domain as an Authorized Email Domain and complete the ownership verification flow described in Salesforce Help. Once a domain is authorized and verified, users with email addresses on that domain can send from those addresses in Salesforce.
Even after domain verification, user email address verification remains mandatory with no exceptions.
1- Create a DKIM Key
DKIM is an email security standard that adds a digital signature to messages sent from your domain. That signature lets receiving mail servers confirm the email is authentic and hasn't been changed in transit.
Because DKIM helps establish trust with inbox providers, it can also improve deliverability and reduce spam filtering. In Salesforce, an active DKIM key also satisfies the domain verification requirement. For example, if example.com has an active DKIM key, then users with a verified @example.com email address can send email from Salesforce.
It is important to mention that DKIM is the recommended solution for email domain verification in Salesforce.
Read this post to learn how to setup a DKIM in Salesforce.

2- Manage Authorized Email Domains
You can set up an authorized email domain to verify your email-sending domain without DKIM.
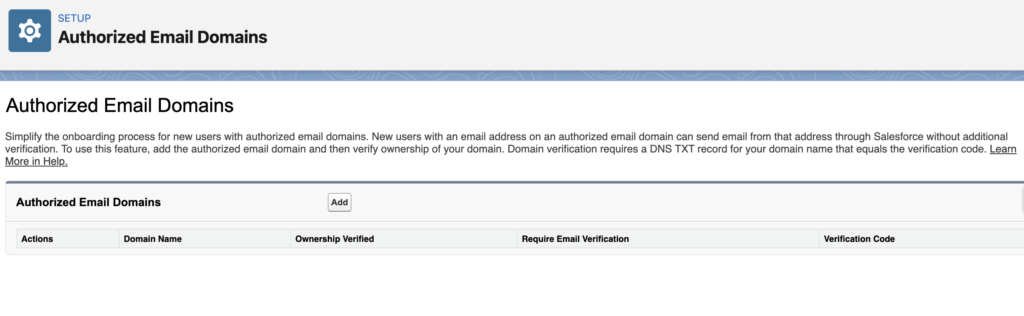
Here is how to set up an authorized email domain in Salesforce:
1- In Setup, type Authorized Email Domains in Quick Find.
2- Select Authorized Email Domains.
3- Click Add.
4- Enter the domain name (for example, example.com).
5- Click Save.
6- Copy the verification key Salesforce generates (example: 00D000000000P18=1AB00000000000B).
7- In your DNS provider, add a TXT record for the domain.
8- Use the domain name with or without the _sfdv. prefix (for example, _sfdv.example.com or example.com).
9- Paste the Salesforce verification key/value into the TXT record value field.
Here is an example DNS TXT record for verifying an Authorized Email Domain. This example uses example.com, org ID 00D000000000P18, and verification key 1AB00000000000B.
Name                 TTL   CLASS   TYPE    VALUE
--------------------------------------------------------------------
example.com.         600   IN      TXT     "00D000000000P18=1AB00000000000B"
Here is another example of a DNS TXT record for the same domain and verification key with the _sfdv. prefix.
Name                 TTL   CLASS   TYPE    VALUE
--------------------------------------------------------------------
_sfdv.example.com.   600   IN      TXT     "00D000000000P18=1AB00000000000B"
10- Save the DNS change, then return to Salesforce and complete the verification step.
11- In Setup, enter Authorized Email Domains in Quick Find, then open Authorized Email Domains.
12- Find your domain and click Edit.
13- Turn on Verify domain ownership.
14- If verification succeeds, Verify domain ownership stays enabled. If verification fails, confirm the required DNS TXT record exists and wait for DNS propagation, then try again.
15- To enforce user-level verification for users on this domain, enable Require email verification (it is enabled by default).
It's important to note that if Require email verification is disabled, any user with permission to create users can set any email address on the verified domain. Because that can create security risk for your company, it's best to keep this setting enabled unless you've explicitly evaluated and accepted the risk.
Do we need this setup if my instance have email relay