
A picklist field in Salesforce lets you choose a value from a predefined list. Choices in a picklist field have two main attributes: Value and API Name. Value is the text that the user sees on the user interface. It is the text that you see while selecting a choice from the picklist field. On the other hand, API Name is the real value that is stored in the field. If you query the record, you will see the value from the API Name and not the value.
As you can see in the picture below, if the user selects "Grocery" from this picklist field called Account_Group__c, the real value that the field will store is "01".

If it is a picklist field that is integrated with another system, then you can make the API Names of the choices same as the other system. Therefore, you can easily map the values (API Names). Since the users see the choice values and not the API Names, this wouldn't be an issue. However, there are a few places where it causes trouble. Such as formulas.
Use Picklists in Formulas
There are many areas in Salesforce where you have to use a formula. For example, formula fields, validation rules, field updates using a formula, etc. Even though it is completely possible to use a picklist field in a formula, there is one big issue. Formulas work with picklist choice's API Name and not with the value. For example, if you select "Grocery" from the previous picklist example, then TEXT(Account_Group__c) will return "01" and not "Grocery".
Read and complete this Trailhead module to learn more about picklists in formulas.
In some cases, you might need to display the selected value in a formula field. To do so, you can create a formula field and use the CASE() function. For example, this formula will return the selected picklist choice value.
CASE(TEXT(Account_Group__c),
"01", "Grocery",
"02", "Minimarket",
"03", "Private Gold",
"04", "24h Kiosk",
"05", "Key Accounts", "")
However, as you can see, you have to do the same mapping in the formula. If you add a new choice to the picklist field, then you have to add it to the formula field as well. Moreover, since it is a formula field, there is a character limit. So if your picklist field has many choices, then you will probably exceed this limit.
Using Record-Triggered Flow to Save the Picklist Choice Value
Since a formula field is a little problematic, you can use a before save record-triggered flow to save the picklist choice value. Read this post to learn more about record-triggered flow and the difference between before save and after save.
Let's create a flow to save the selected Model_Code__c choice value into a text field. Model_Code__c is a picklist field that has many choices with different values and API names.
1- Create a text field to save the selected choice's value. If you want to put this field on the page layout, make sure to mark it as read only. Only the flow should be able to change its value.

2- Create a record-triggered flow, select your object, and configure the flow to run on create and update. Optimize the flow for fast field updates. This will make the flow run before save, which means that it won't consume from DML limits and will be 10 times faster.

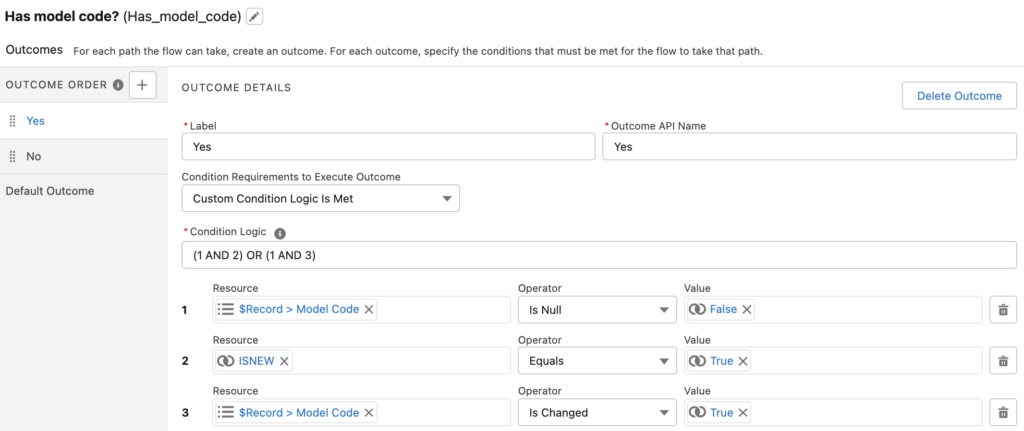
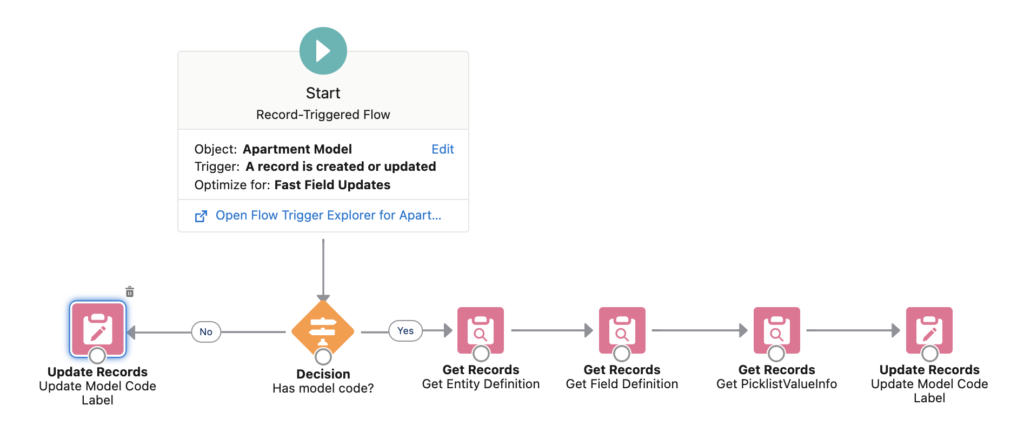
3- Add a decision to check if the Model_Code__c has changed or if it is a new record. Because if not, there is no need to continue.
Divide the decision into two outcomes. If it is a new record and there is a model code or if the model code is changed to another value, then you will need to perform some gets. However, if the model code is changed to null, then you will just need to update the text field to blank value.
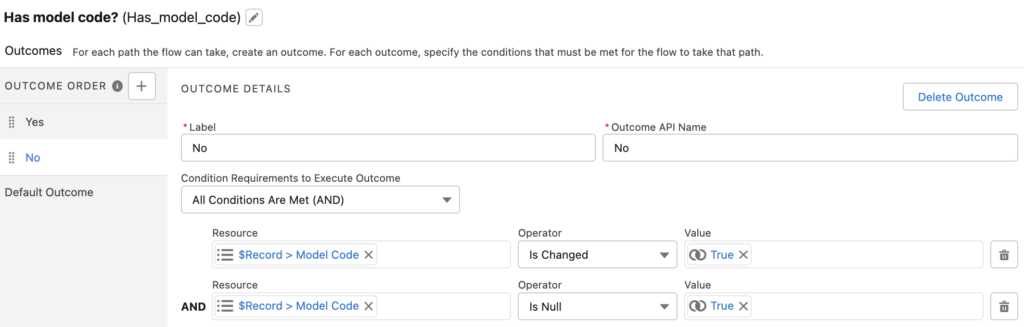
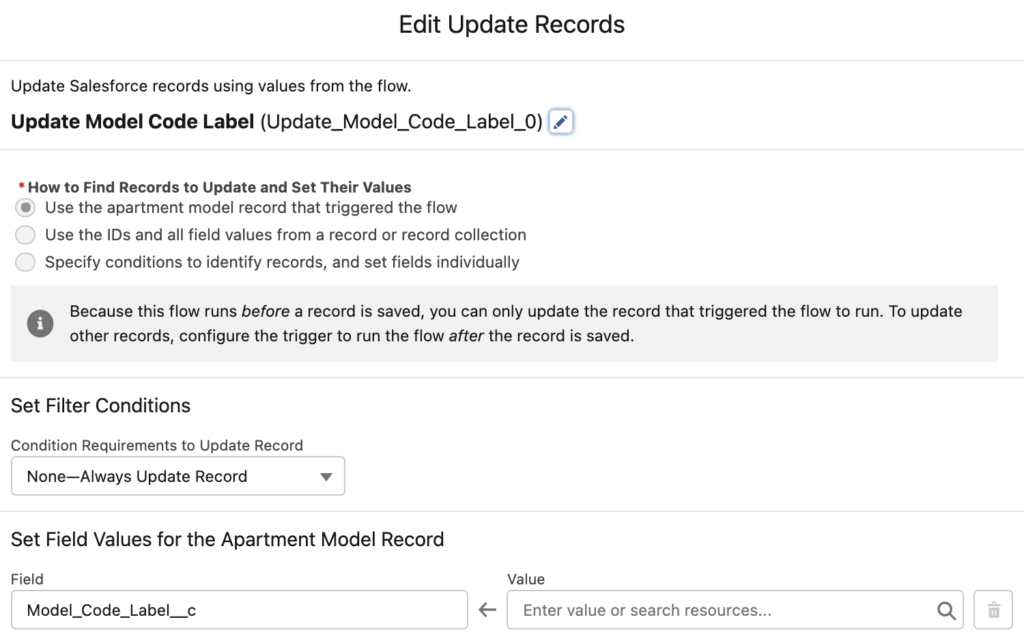
4- If the Model_Code__c is changed to null (it is the "No" outcome of the decision element), then just update the Model_Code_Label__c to blank value.
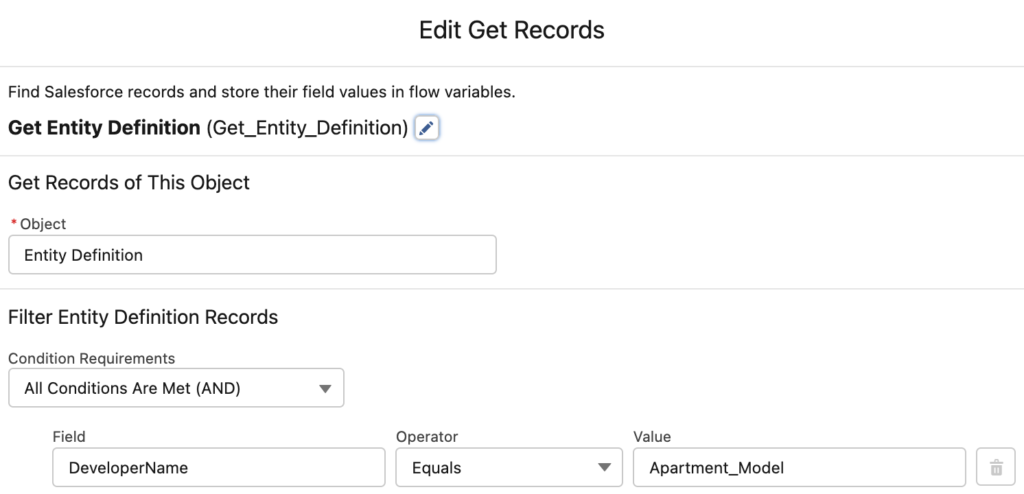
5- Entity Definition provides row-based access to metadata about standard and custom objects. Add a Get Records element to get the Entity Definition for your object. DeveloperName from the Entity Definition should be equal to your object's name. If you are using a custom object, make sure that you don't include "__c" at the end. For example, write "Apartment_Model" instead of "Apartment_Model__c".
6- Field Definition represents a standard or custom field. It provides row-based access to field metadata. Add a Get Records element to get the Field Definition for your picklist field. QualifiedApiName of the Field Definition should be equal to the API| Name of your picklist field. In this example, it is Model_Code__c. EntityDefinitionId should be equal to DurableId of the Entity Definition record that you got in the previous step ({!Get_Entity_Definition.DurableId}).

7- Picklist Value Info represents the active picklist values for a given picklist field. Add a Get Records element to get the selected picklist choice's value. EntityParticleId should be equal to DurableId of the Field Definition record that you got in the previous step ({!Get_Field_Definition.DurableId}). Value should be equal to the selected picklist choice from your record, in this example it is Model_Code__c.
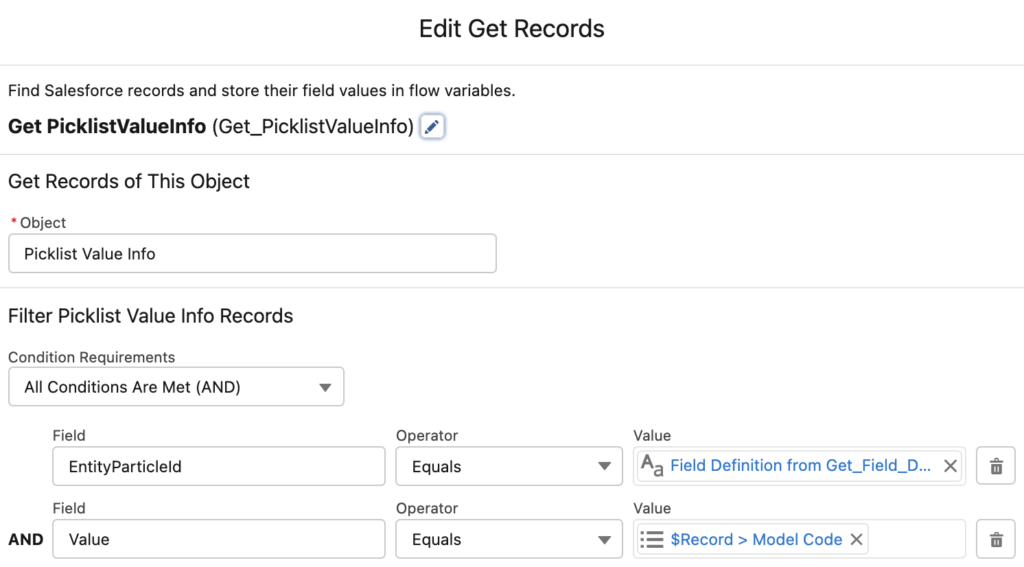
After completing this step, you have the picklist choice value that you were looking for. It is stored in the label field of the Picklist Value Info record ({!Get_PicklistValueInfo.Label}).
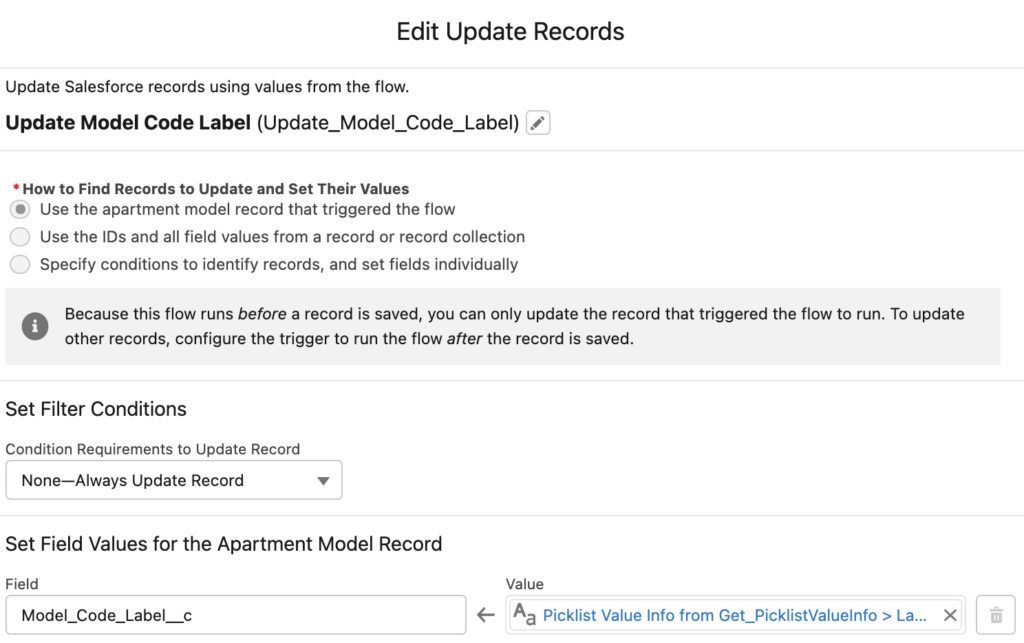
8- Now it is time to update the record with the value that you got in the previous step. Add an Update Record or a Decision element (it doesn't matter since it is a before save flow) to update the triggering record.
End of the Flow
At the end, your record-triggered flow should look like this.
As you can see, even though the picklist field (Model_Code__c) stores the API Name of the selected choice, Model_Code_Label__c stores the Value.

You can use the same logic in many places. For example, you can include a picklist choice's value in the naming convention for an object.
See the flow in action.
This is awesome! Thanks for sharing!
This is great. Thank you. I have countries picklist and the formula method was not sufficient. I was going to write apex class just to get value, not the api value for that, but I found your article. Using flow to achieve that is amazing.
I am glad that it solved your issue!
Hi Alex and/or Yumi - I'd love to know how you used this with a countries picklist. I'm currently trying to use this for the State/Province values. The available Field Definition for the address field I'm looking at only has the composite address field, not the State/Code field that forms part of it. So then when I use the GET record element on the PicklistValueInfo object with the DurableId of the composite field, nothing is returned.
So how does one get the DurableId for just the State/Code part of the address field? I'm using a custom object too, if that's relevant.
Hi,
I think you need to use metadata api for this. So, it is not possible to get the values like any other picklist field.
I found this idea:
https://ideas.salesforce.com/s/idea/a0B8W00000GdfnVUAR/state-country-picklists-ability-to-query-state-and-country-through-apex?sfdcIFrameOrigin=null
Thanks Yumi!
I did actually manage to solve this, so for anyone else stumbling across this:
- I was using a custom address field on a custom object, but the available state and country picklists are identical to what is available in address fields elsewhere, such as Billing Address on Account. This means I don't actually need to get the exact Field definition etc. of my custom object and field.
- Therefore, I've skipped a couple steps and just have one GET element that looks at the PicklistValueInfo object with 2 conditions. Condition 1: EntityParticleId equals 'Account.BillingAddress.BillingStateCode' (as it's a standard field, this will work for any org, and if you need Country instead, just use Account.BillingAddress.BillingCountryCode). Condition 2: Value equals the state code field from my custom address field ({!$Record.MailingAddress__StateCode__s}).
- Then I update the record based on that. It works a dream! Wouldn't have solved it without this article, so many thanks Yumi.
I'm getting a null value. Thoughts on what I'm doing wrong. The picklist is tied to a global value set.
Hi Matt,
I just tried with a picklist field tied to a global value set and it worked.
Can you debug the flow and see if it is finding the EntityDefinition, FieldDefinition, and PicklistValueInfo?
Good call, its not finding the Entity Definition.
Mine finds the Entity Definition, but isn't finding the Field Definition however.
Is it a custom object/field?
How do you get the field definition? Are you using the durableId of the entity definition and the api name of the field?
Still getting the error though... The only difference I can see is that the value that
is pulled from the record is in quotes and the value that is trying to be populated isn't.
Result
{!VarRCreateCoOpRequest.RecordTypeId} = "0121T000000cKfBQAU"
{!VarRCreateCoOpRequest.Sales_Rep__c} = "0051T000008zDd3QAE"
{!VarRCreateCoOpRequest.Requested_Amount__c} = "1,000"
{!VarRCreateCoOpRequest.Spend_Type__c} = "Custom Displays (CDS)"
{!VarRCreateCoOpRequest.Funding_Source_Co_Op_Budget__c} = "a0P7A000005ZKC2UAO"
{!VarRCreateCoOpRequest.Funding_Source__c} = "Sales Rep"
{!VarRCreateCoOpRequest.CO_OP_Source_Account__c} = "0017A00000pZBEzQAO"
{!VarRCreateCoOpRequest.Description__c} = "These are comments"
{!VarRCreateCoOpRequest.Co_Op_Spend_Proposal_1__c} = "a0S7A0000031ld1UAA"
CREATE RECORDS: Create Co-Op Request
Create CO_OP_Funds_Request__c records using the values that are stored in
{!VarRCreateCoOpRequest}.
Variable Values
[
CO_OP_Source_Account__c=0017A00000pZBEzQAO,
RecordTypeId=0121T000000cKfBQAU,
Funding_Source__c=Sales Rep,
Sales_Rep__c=0051T000008zDd3QAE,
Spend_Type__c=Custom Displays (CDS),
Requested_Amount__c=1000.0,
Description__c=These are comments,
Funding_Source_Co_Op_Budget__c=a0P7A000005ZKC2UAO,
Co_Op_Spend_Proposal_1__c=a0S7A0000031ld1UAA]
Result
Failed to create records.
Error Occurred: This error occurred when the flow tried to create records:
INVALID_OR_NULL_FOR_RESTRICTED_PICKLIST: bad value for restricted picklist field:
Custom Displays (CDS).
You can look up ExceptionCode values in the SOAP API Developer Guide.
You are trying to enter Custom Displays (CDS) to Spend_Type__c picklist but looks like it is a restricted picklist and this value is not available.
INVALID_OR_NULL_FOR_RESTRICTED_PICKLIST: bad value for restricted picklist field:
Custom Displays (CDS).
Right but the flow is pulling the value from a picklist field that has is tied to the same global value set.
Thanks - This helped me
I am glad that it helped you!
This is great, however, how do we filter the values by record type? Thanks!
Hi Jay,
I believe it is not possible at the moment.
I see that there is an open idea for this.
https://ideas.salesforce.com/s/idea/a0B8W00000GdVwoUAF/getting-picklist-values-based-on-record-type
I believe filtering picklist values by record type has been delivered in flows in Winter '23"
https://ideas.salesforce.com/s/idea/a0B8W00000GdaORUAZ/allow-filter-of-picklist-values-based-on-record-type?sfdcIFrameOrigin=null
Yes, that's right. I believe this is available only if you are using dynamic forms for flow (fields section).